Video-Encoder -Streamer Tipps and tricks
Here we are publishing some tipps about keyframe, ONVIF and RTSP to RTMP from an IPC (Camera)...
Download part 1-6 as PDF in englishget it!
One side-Tipp for CISCO-fans or techies who accidently use a Layer3 IGMP Cisco-Switch: It might be, that Problems occur with the IPTV Multicast UDP SPTS streams in Cisco's: You should set following values in the Cisco Switch-Menu - your IPTV streams in UDP will perform better w/o stucking pictures...:
   maxmtupktsperloop      2
   waitdone             500000
   MTU > 1500  e.g set to 1524 or even higher - if you are using VLAN's
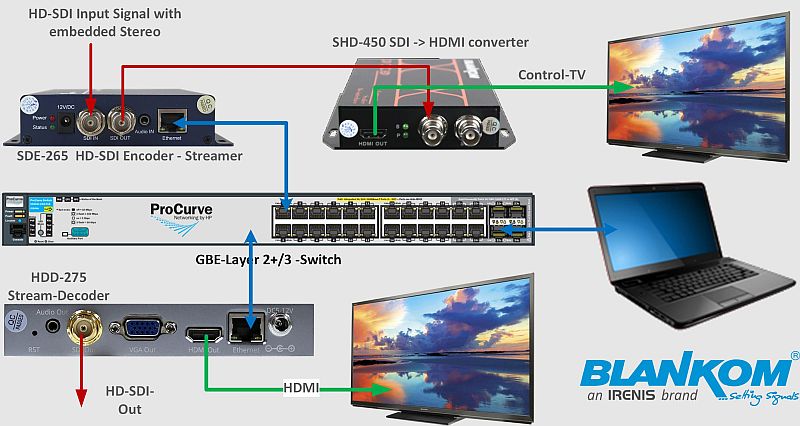
An Example about a Setup with Encoder/Decoder and Converter Units:
Question: How to set the optimal Keyframe frequency / I-Frame Interval(s) for YouTube and Facebook Live by our IP Video Encoder?
Video Encoder Settings for I-Frame-keyframe-Interval(s) for YouTube or Facebook Live:
Starting with: Damned, what’s a Keyframe?
The keyframe (I-frame) is the full frame of the image in a video.
Subsequent frames, the delta frames, only contain the information that has been changed from picture to picture. Keyframes will
appear multiple times within a coded stream, depending on how it was created or
how it’s being streamed.
How to set the optimal Keyframe frequency/I-Frame(keyframe) Interval (S) for YouTube & Facebook Live
by the BLANKOM IP Video Encoder?
Facebook:
An I-frame (keyframe) must be
sent at least every 2 seconds within the Video-stream.
YouTube:
Keyframe frequency: Recommended 2 seconds but should not exceed 4 seconds.
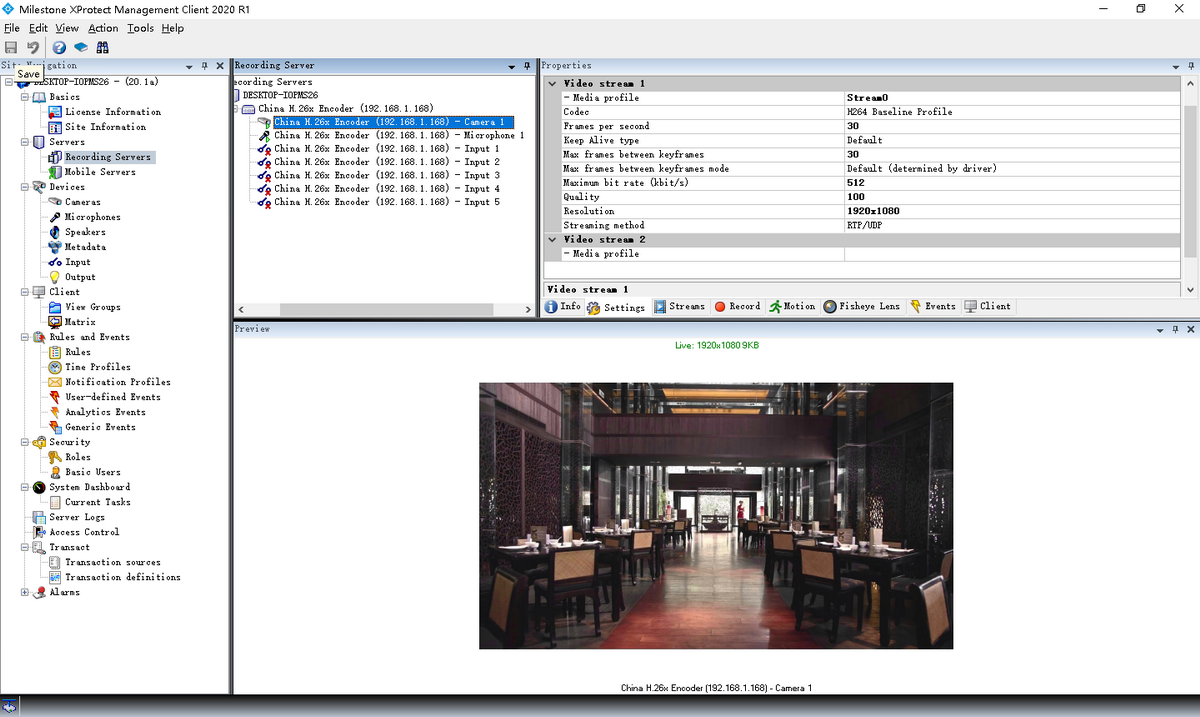
Keyframe frequency / I-Frame(keyframe) value:
Interval (S) = GOP/FPS. The below stream I-Frame Interval (S) is 2s, resulting from GOP/FPS=50/25:

BLANKOM ONVIF Video Encoders are working together with Milestone VMS Software
How to Integrate Non-IP Video Sources into Milestone VMS Software with BLANKOM SDI, HDMI and VGA or CVBS Analog encoders
If you are using Milestone VMS Software
to manage your video surveillance system, you may encounter some situations where you need to integrate non-IP video sources into
your network.
For example, you may want to monitor a PC screen that a security guard is watching or a non-network enabled camera that is already installed.
In these cases, you may think that you have to re-wire and retrofit your existing equipment,
which can be costly and time-consuming.
However, there is a simpler and easier solution: Using BLANKOM Encoders
BLANKOM Encoders are devices that can convert any SDI, HDMI, VGA, or CVBS analog video signal
into an IP stream that can be integrated into Milestone VMS Software via a network.
This way, you can view and record
your non-IP video sources on your VMS software without changing your hardware.
BLANKOM Encoders support various video formats and
resolutions, including 4K HDR, and can encode in H.264 or H.265 for optimal bandwidth and storage efficiency.
They also support the open standard ONVIF protocol, which means
they are compatible with most IP cameras and Network Video Recorders (NVR) on the market.
BLANKOM Encoders are easy to install and configure, and they come with a web-based interface that allows you to adjust the settings and preview the video output. You can also use BLANKOM’s free tool to search and manage multiple encoders on your network.
With BLANKOM Encoders, you can expand your video surveillance system with non-IP video sources without compromising the quality and performance of your network. You can also enjoy the flexibility and convenience of accessing your video feeds from anywhere on your network.
If you want to learn more about BLANKOM Encoders and how they work with Milestone VMS Software, you can contact us for more information.
A Decoder as Transcoder using the HDD-276
How to convert an IPC (Camera) RTSP to a RTMP Stream?
With the rapid development of the security monitoring industry, more and more surveillance cameras are widely used, but mostly of the IP
cameras are support RTSP ONVIF protocols, it’s not easy to view the video over internet or from other location.
By the BLANKOM HDD-276 4K 60FPS HDMI CVBS Decoder and Transcoder,
you can decode the IP
camera RTSP stream (also, supports SRT / HTTP(S) / HLS / FLV / RTMP(S) / UDP/RTP (Unicast/Multicast), ONVIF stream), and output HDMI,
CVBS and L/R
stereo audio, at the same time, our HDD-276 can do a re-streaming, converting the IPC –RTSP stream to RTMP and push this
to a 3rd party live stream platform or a media
streaming server.
With the BLANKOM HDD-276 Decoder & Transcoder you don’t need to do any changes for the original surveillance camera, the HDD-276 converts the RTSP video stream
from the surveillance camera into an RTMP live stream.

Steps:
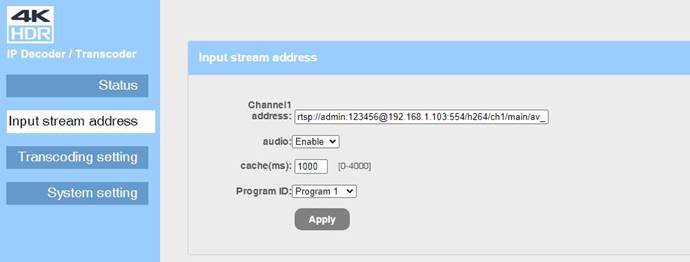
1. Copy the RTSP URL from the IP camera
2. Login the WEB control panel of HDD-276, click the 'Input Stream Address ', and paste the RTSP URL to it:
3. Chose the 'Transcoding setting' menu and configure the RTMP URL of the platform we want to push to, then enable (APPLY) it:
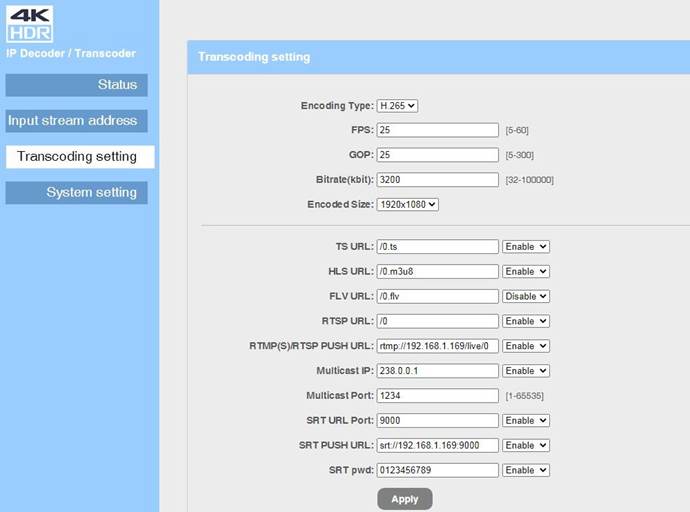 >
>
4. Set the BLANKOM HDD-276 Decoder and Transcoder - Decoder output resolution for HDMI & CVBS:
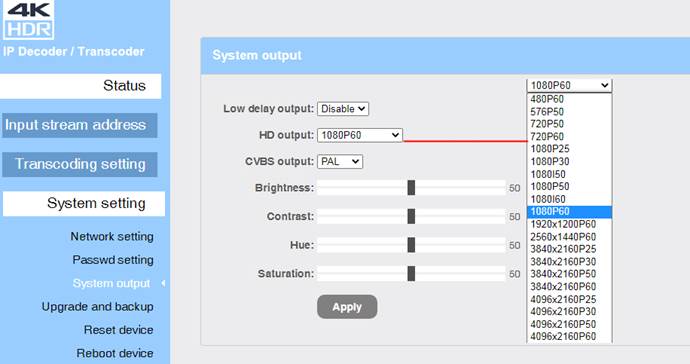
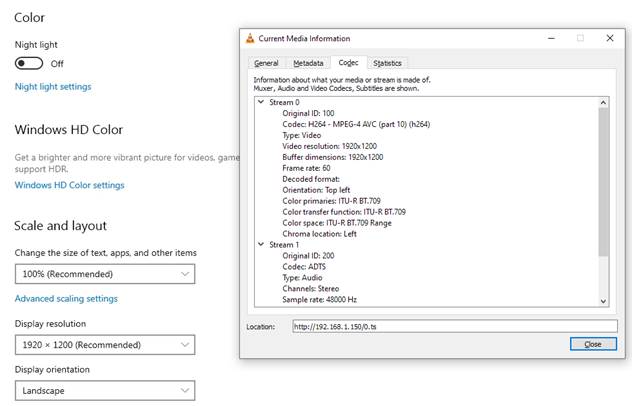
WUXGA 1920x1200@60fps and UXGA 1600x1200@60fps Input with our HDMI Video Encoder:
BLANKOM Video Encoders support as input also the meanwhile 'special' non TV-HD PC-formats:
WUXGA 1920x1200@60fps and UXGA 1600x1200@60fps but you need a special firmware from us. You can > click here to contact us if needed.
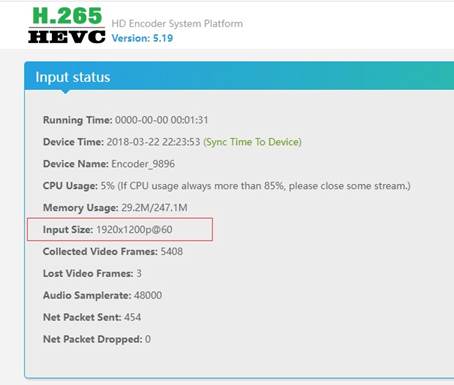
Example: WUXGA 1920x1200@60fps input to BLANKOM H265 HDMI Video Encoder can be caused sometimes used by MS-Windows PC’s or older Grafic-hardware:
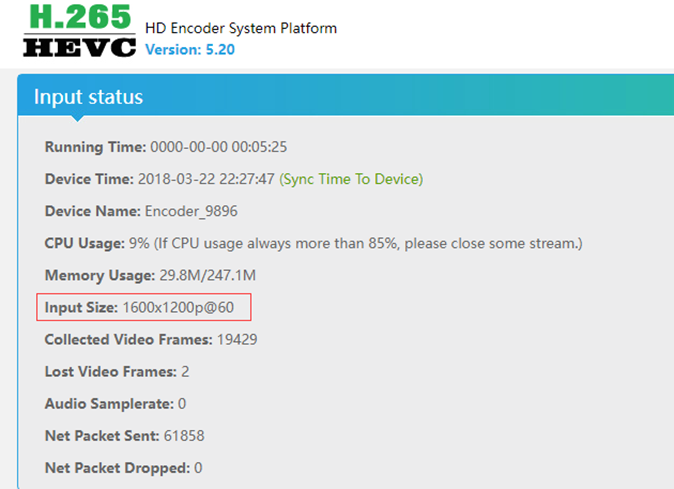
Set UXGA 1600x1200@60fps input and output for H265 Video Encoder:
Play an SRT Stream from Encoder to PC by FFMPEG:
BLANKOM Video Encoders are supporting the SRT Protocol streaming.
After login, set the encoder Stream output SRT to enable and Apply it:
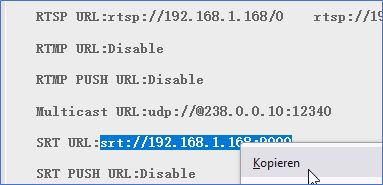
VLC on a MS-Windows PC is able to play SRT streams but the Linux Version might have problems...
anyway, on both platforms the FFMPEG binaries can be installed:
Linux---> simply do "sudo apt install ffmpeg"
Windows: Go to https://ffmpeg.org/download.html
Than select your OS: MAC, Linux or MS Windows, chose a proper link for a binary like:

and install it:
extract it to a folder named like ffmpeg but you need the 7zip freeware packer - and move the folder to a known path:
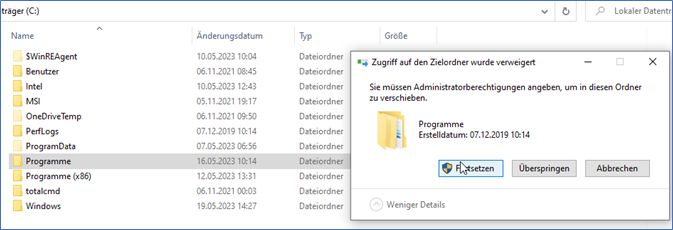
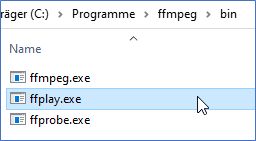
you might need admin rights, change to the folder .../ffmpeg/bin/:
than open the command -line (maybe powershell but as administrator and enter the stream address but
Remark: You need to add a " .\ " before the ffplay executable because the powershell demands it from you (security issue):
 .
.
you'll get some messages but after a while your Fullscreen Video appears:

You can ffplay it in a window like add -x 720 -y 480 bevore the SRT IP/Port address -> Please check the documentations
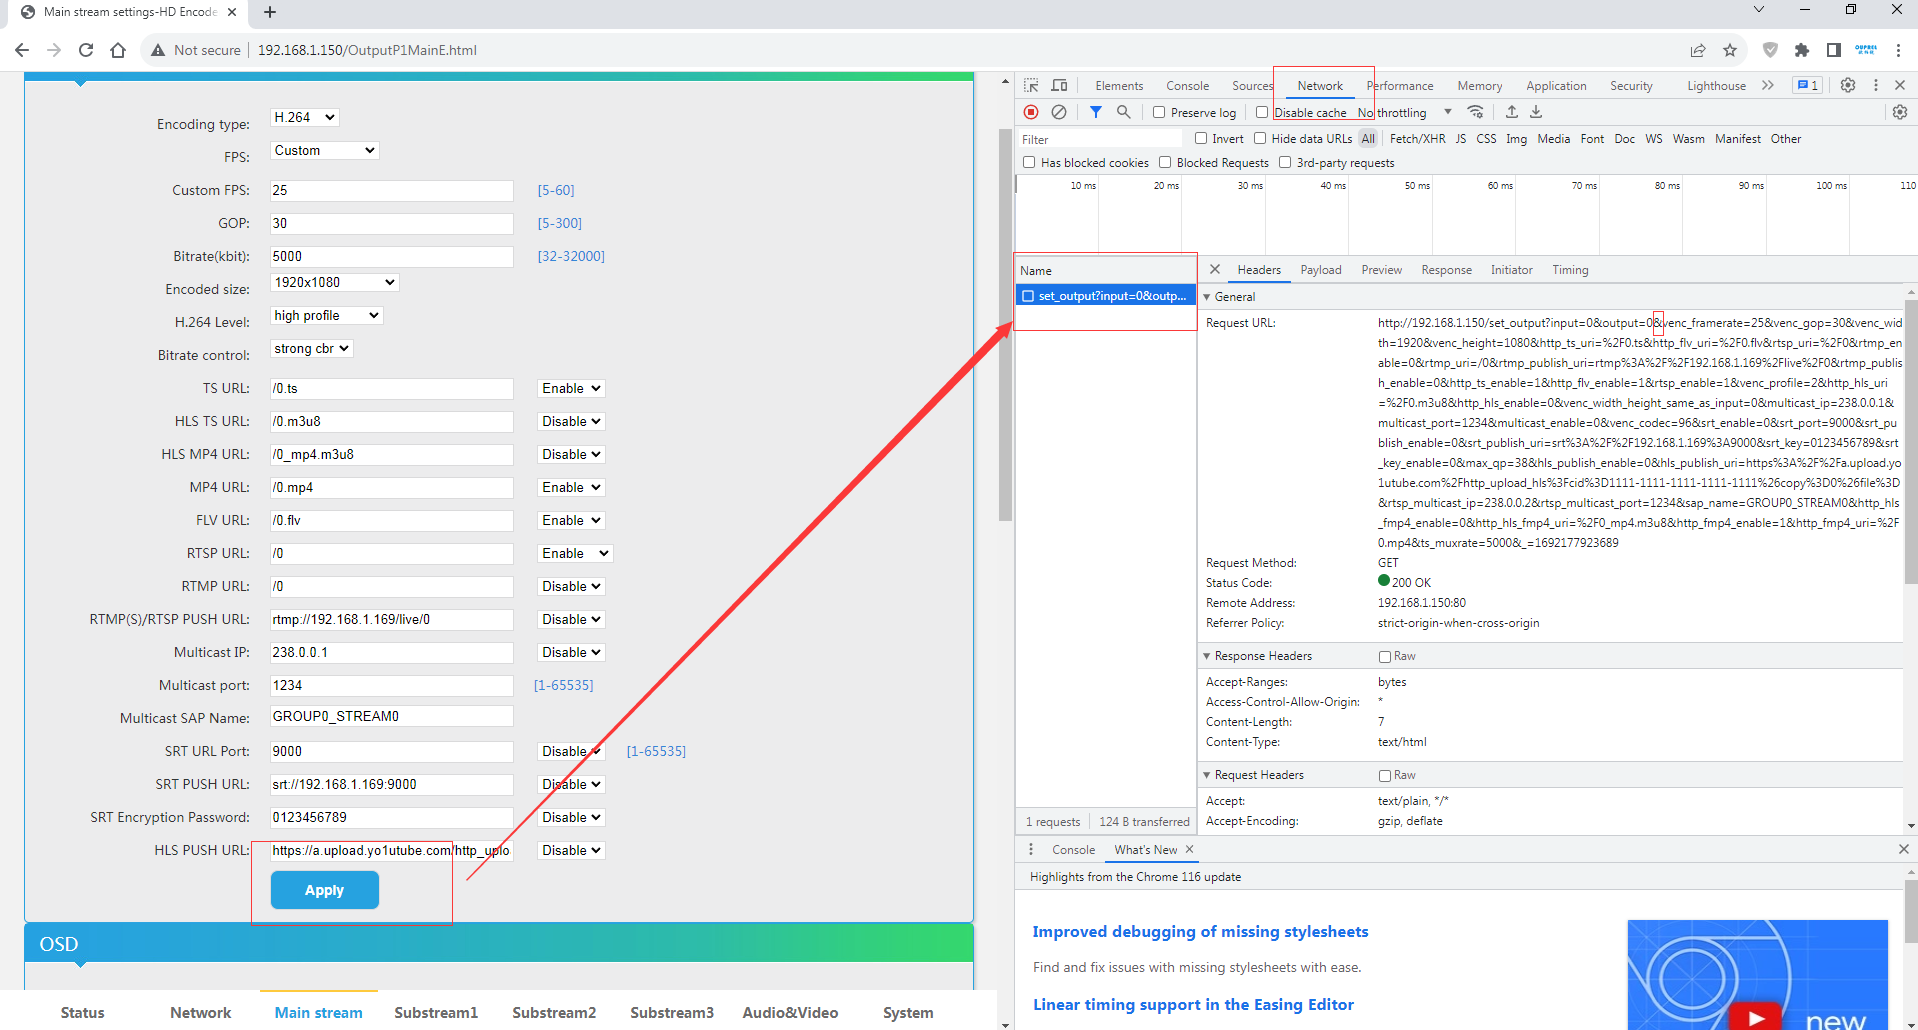
Special off topic HTTP-Commands for remote handling of the SoC Encoders w/o the need for using the Web-GUI:
Starting with an Example for the MAIN encoder part - so the MainStream-Engine:
Example: The IP Address of the SoC Encoder is 192.168.1.150 then following command switches OFF the multicast (udp or rtp) output:
(can be used with a linux-terminal or Windows-CMD/PS ... whatever your OS is supporting for shell scripts)
Attention: The target Webserver in the encoder needs the login data "user:password" - to let you in: So http://admin:admin@IP-Address/... as prefix needed.
http://192.168.1.150/set_output&multicast_enable=0
http://192.168.1.150/set_output&multicast_enable=1....Switch it ON again.
--- The basic reason is explained with this picture (click on= better view):
If you like to switch OFF / ON all Main-stream protocols:
IP Addresse is again 192.168.1.150
please use:
http://192.168.1.150/set_output?&rtmp_enable=0&rtmp_publish_enable=0&http_ts_enable=0&http_flv_enable=0&rtsp_enable=0&http_hls_enable=0&multicast_enable=0&srt_enable=0&srt_publish_enable=0&srt_key_enable=0&hls_publish_enable=0&http_hls_fmp4_enable=0&http_fmp4_enable=0
To go ON simply use the '1' instead of the '0' like in ...&rtmp_enable=1
If you need to address the Substreams/Secondary 1-3 Encoder-Streams to manage them ON/OFF:
you need to add a further argument 'output' :
With 'output=1' you are addressing the values of Encoder-Stream-Engines: 0..3 , 0=mainstream, 1...3=substream
http://192.168.1.150/set_output?output=1&rtsp_enable=0&http_hls_enable=0&multicast_enable=0
or as example to switch all to 'OFF' of all streams in Sub-Stream 1 engine:
http://192.168.1.150/set_output?output=1&rtmp_enable=1&rtmp_publish_enable=0&http_ts_enable=0&http_flv_enable=0&rtsp_enable=0&http_hls_enable=0&multicast_enable=0&srt_enable=0&srt_publish_enable=0&srt_key_enable=0&hls_publish_enable=0&http_hls_fmp4_enable=0&http_fmp4_enable=0
The full disabling of any Test-Picture stream-outputs if input signal is lost or disconnetced (default) works with:
http://192.168.1.150/set_sys?kick_all=1
This command re-enables the testpicture-stream in case of SIGNAL-Loss :
http://192.168.1.150/set_sys?kick_all=0
All of this works in the WINDOWS CMD window (or if you like to write a batch file):
C:\>curl "http://admin:admin@192.168.1.150/set_output?output=0&multicast_enable=0"
Result: 'succeed' as answer from the webserver.
Note: No extra brackets for the & are needed here.
To simply use it in Windows 10 command line scripting in the Powershell (PS), you can install following tool:
https://www.coretechnologies.com/products/http-ping/http-ping.exe
copy it to the C:\Windows\system32 folder as administrator so it will be accessible from any windows location or folder = its in the Path.
Then open the PS:
BUT: You need to put the & in brackets: “&” to pass this as part of the command because otherwise it assumes the & is part of the command-line syntax.
---------------------------------------------------------------------------
PS C:\> http-ping http://admin:admin@192.168.0.168/set_output?output=0"&"multicast_enable=1
Or to disable a stream-output:
http-ping http://admin:admin@192.168.0.168/set_output?output=0"&"multicast_enable=0
it works in the CMD instead PS as well:
C:\>http-ping http://admin:admin@192.168.0.168/set_output?output=0"&"multicast_enable=0
results in:
---------------------------------------------------------------------------
Pinging "http://admin:admin@192.168.0.168/set_output?output=0&multicast_enable=0":
1> Reply: [200/OK] bytes=7 time=181ms
2> Reply: [200/OK] bytes=7 time=184ms
3> Reply: [200/OK] bytes=7 time=129ms
4> Reply: [200/OK] bytes=7 time=63ms
Ping statistics for "http://admin:admin@192.168.0.168/set_output?output=0&multicast_enable=0":
Packets: Sent = 4, Received = 4, Lost = 0 (0% loss)
Approximate round trip times in milli-seconds:
Minimum = 63ms, Maximum = 184ms, Average = 139ms, Deviation = 49ms
---------------------------------------------------------------------------
This free utility is Copyright 2019, Core Technologies Consulting, LLC.
Find out about this and our other products at our web site:
http://www.CoreTechnologies.com/
---------------------------------------------------------------------------
What is Haivision SRT?
- Thanx to the open source crew from
1. Understanding how SRT works
SRT used to be done through a tool called srt-live-transmit. This executable would be able to take incoming pipes or files and send them out as SRT or listen for SRT connections to then provide the stream through standard out. We kept the usage within MistServer quite similar to this workflow, so if you have used this in the past you might recognize it.
Connections in SRT
To establish a SRT connection both sides need to find each other. For SRT that means that one SRT process is listening for incoming connections (Listener mode) and the other side will reach out to an address and call for the data (caller mode).
Listener mode
In SRT the listener means the side of the SRT connection that expects to receive the streaming data. By default in SRT this is the side that monitors a port and awaits a connection.
Caller mode
In SRT the caller means the side of the SRT connection that sends out the streaming data to the other point. By default in SRT this is the side that establishes the connection with the other side.
Rendezvous mode
In SRT Rendezvous mode is meant to adapt to the other side and take the opposite. If a rendezvous connection connects to a SRT listener process it’ll become a caller. While this sounds handy we recommend only using listener and caller mode. That way you’re always sure which side of the connection you are looking at.
Don’t confuse listener for an input or caller for an output
As you might have guessed from the defaults they do not have to apply in all cases. Many people confuse Listener for an input and Caller for an output.
It is perfectly valid to have a SRT process listen to a port and send out streaming data to anyone that connects. That means that while it is listening, it is meant to be serving (outputting) data.
In most cases you will use the defaults for listener and caller, but it is important to know that they are not inputs or outputs.
They only signify which side reaches out to the other and which side is waiting for someone to reach out.
Putting this to practise
The SRT scheme is as follows:
srt://[HOST]:PORT?parameter1¶meter2¶meter3&etc...
HOST This is optional. If you do not specify it 0.0.0.0, meaning all available network interfaces will be used
PORT This is required. This is the UDP port to use for the SRT connection.
parameter This is optional, these can be used to set specific settings within the SRT protocol.
You can assume the following when using SRT:
- Not specifying a host in the scheme will imply listener mode for the connection.
- specifying a host in the scheme will imply caller mode for the connection.
- You can always overwrite a mode by using the parameter
?mode=caller/listener. - Not setting a host will default the bind to: 0.0.0.0, which uses all all available network interfaces
Some examples
srt://123.456.789.123:9876
This establishes a SRT caller process reaching out to 123.456.789 on port 9876
srt://:9876
This establishes a SRT listener process monitoring UDP port 9876 using all available network interfaces
srt://123.456.789.123:9876?mode=listener
This establishes a SRT listener process using address 123.456.789.123 and UDP port 9876.
srt://:9876?mode=caller
This establishes a SRT caller process using UDP port 9876 on all available interfaces
2. How to use SRT as input
Both caller/listener inputs can be set up by creating a new stream through the stream panel.
SRT LISTENER INPUT
SRT listener input means the server starts an SRT process that monitors a port for incoming connections and expects to receive streaming data from the other side. You can set one up using the following syntax as a source:
srt://:port

The above starts a stream srt_input with a SRT process monitoring all available network interfaces using UDP port 9876.
This means that any address that connects to your server could be used for the other side of the SRT connection.
The connection will be succesfull once a SRT caller process connects on any of the addresses the server can be reached on, using UDP port 9876.
If you want to have SRT listen on a single address that is possible too, but you will need to add the ?mode=listener parameter.
srt://host:port?mode=listener
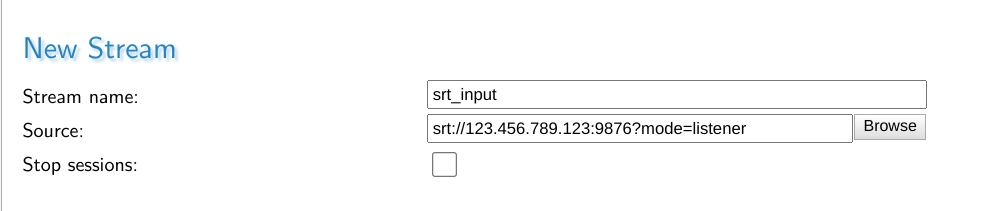
The above starts a stream srt_input with a SRT process monitoring the address 123.456.789.123 using UDP port 9876.
The server must be able to use the given address here, otherwise it will not be able to start up the SRT process.
The connection is succesfull once a SRT caller process connects on the given address and port.
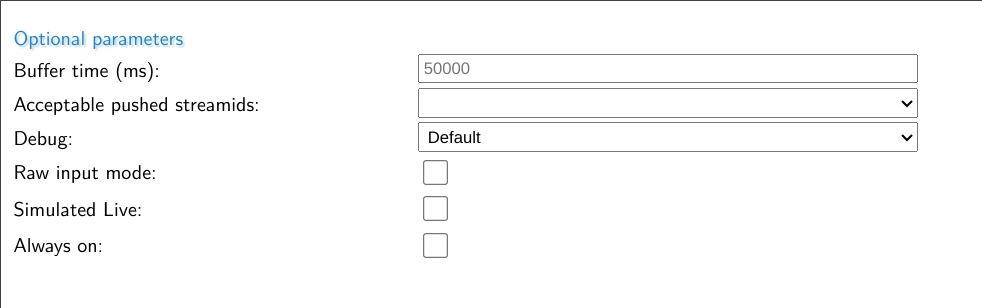
Important Optional Parameters
The optional parameters are avaialble right under the Stream name and Source fields.
| Parameter | Description |
|---|---|
| Buffer time (ms) | This is the live buffer within MistServer, it is the DVR window available for a live stream. |
| Acceptable pushed streamids | Here you can choose what happens if the ?streamid=name parameter is used if SRT connections matching this input are made. It can become an additional stream (wildcard), it can be ignored (streamid is not used, it is seen as a push towards this input instead or it can be refused.) |
| Debug | Set the amount of debug information |
| Raw input mode | If set the MPEG-TS information is passed on without any sort of parsing/detection by MistServer |
| Simulated live | If set the MistServer will not speed up the input in any way and play out the stream as if it’s coming in in real time |
| Always on | If set MistServer will continously try monitor for streams matching this input instead of only when a viewer attempts to watch the stream. |
The most important optional parameter is the Always on flag. If this is set MistServer will continously monitor the given input address for matching SRT connections.
If this is not set MistServer will only attempt to monitor for matching SRT connections if for about 20 seconds after a viewer tried to connect.
SRT CALLER INPUT
SRT Caller input means the server starts a SRT process that reaches out to another location in order to receive a stream.
srt://host:port
The above starts a SRT process that reaches out the address 123.456.789.123 using UDP port 9876. In order for the SRT connection to be successfull there needs to be a SRT listener process on the given location and port.
While it is technically possible to leave the host out of the scheme and go for a source like:
srt://:port?mode=caller
It is not recommended to use. The whole idea of being the caller side of the connection is that you specifically know where the other side of the connection is.
If you need an input capable of being connected to by unknown addresses you should be using SRT Listener Input.
3. How to use SRT as output
SRT can be used as both a Listener output or a Caller output. A listener output means you wait for others to connect to you and then you send them the stream. Caller output means you send it towards a known location.
SRT LISTENER OUTPUT
There’s two methods within MistServer to set up a SRT listener output. You can set up a very specific one through the push panel or a generic one through the protocol panel.
The difference is that setting up the SRT output over the push panel allows you to use all SRT protocols, which is important if you want to use parameters such as
?passphrase=passphrase that enforce an encrytpion passphrase to match or the connection is cancelled.
Setting SRT through the protocol panel only allows you to set a protocol. Anyone connecting to that port will be able to request all streams within MistServer.
Push panel style
Setting up SRT LISTENER output through the push panel is perfect for setting up very specific SRT listener connections. It allows you to use all SRT parameters while setting it up.
up a push stream with target:
srt://:port?parameters

Once the SRT protocol is selected all SRT parameters become available at the bottom.

Using the SRT parameter fields here is the same as adding them as parameters.
You could use this to set a uniquepassphrase for pulling SRT from your server, which will be output-only.
If you add a host to the SRT scheme make sure you set the mode to listener.
Protocol Panel Style
Setting up SRT Listener output through the protocol panel is done by selecting TS over SRT and setting up the UDP port to listen on.
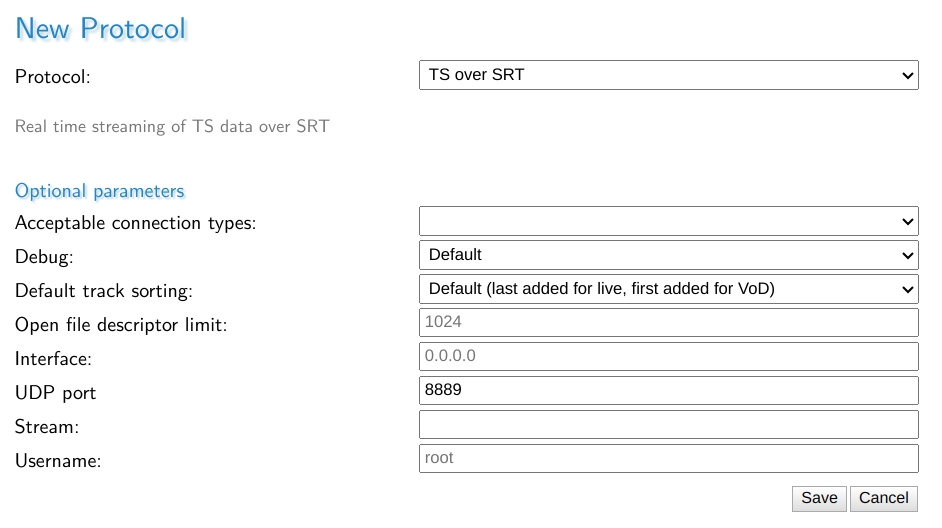
You can set the Stream, which means that anyone connecting directly to the chosen SRT port will receive the stream matching this stream name within MistServer.
However not setting allows you to connect towards this port and set the ?streamid=stream_name to select any stream within MistServer.
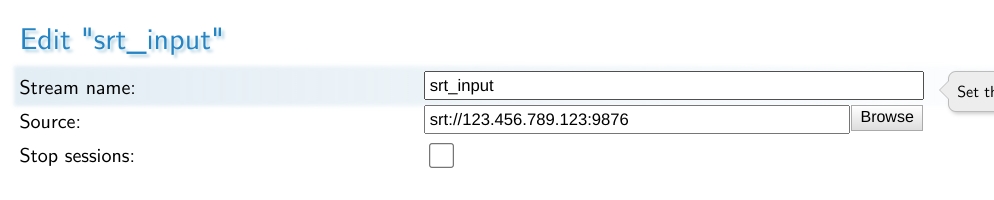
To connect to the stream srt_input one could use the following srt address to connect to it:
srt://mistserveraddress:
8889?streamid=srt_input
SRT CALLER OUTPUT
Setting up SRT caller output can only be done through the push panel. The only difference with a SRT listener output through the push panel is the mode selected.
Automatic push vs push
Within MistServer an automatic push will be started and restarted as long as the source of the push is active. This is often the behaviour you want when you send out a push towards a known location. Therefore we recommend using Automatic pushes.
Setting up SRT CALLER OUTPUT
srt://host:port

The above would start a push of the stream live towards address 123.456.789.123 using UDP port 9876. The connection will be successful if a SRT listening process is available there.

Using the SRT parameter fields here is the same as adding them as parameters.
4. How to use SRT over a single port
SRT can also be set up to work through a single port using the ?streamid parameter.
Within the MistServer Protocol panel you can set up SRT (default 8889) to accept connections coming in, out or both.

If set to incoming connections, this port can only be used for SRT connections going into the server. If set to outgoing the port will only be available for SRT connections going out of the server. If set to both, SRT will try to listen first and if nothing happens in 3 seconds it will start trying to send out a connection when contact has been made. Do note that we have found this functionality to be buggy in some implementations of Unix (Ubuntu 18.04) or highly unstable connections.
Once set up you can use SRT in a similar fashion as RTMP or RTSP. You can pull any available stream within MistServer using SRT and push towards any stream that is setup to receive incoming pushes. It makes the overall usage of SRT a lot easier as you do not need to set up a port per stream.
Pushing towards SRT using a single port
Any stream within MistServer set up with a push:// source can be used as a target for SRT.
What you need to do is push towards
srt://host:port?streamid=streamname
For example, if you have the stream live set up with a push:// source and your server is available on 123.456.789.123
with SRT available on port 8889 you can send a SRT CALLER output towards:
srt://123.456.
789.123:8889?streamid=live
And MistServer will ingest it as the source for stream live.
Pulling SRT from MistServer using a single port
If the SRT protocol is set up you can also use the SRT port to pull streams from MistServer using SRT CALLER INPUT.
For example, if you have the stream vodstream set up and your server is available on 123.456.789.123 with SRT available on port 8889
you can have another application/player connect through SRT CALLER
srt://123.456.
789.123:8889?streamid=vodstream
5. Known issues
The SRT library we use for the native implementation has one issue in some Linux distros.
Our default usage for SRT is to accept both incoming and outgoing connections. Some Linux distro have a bug in the logic there and could get stuck on waiting for data while they should be pushing out when you’re trying to pull an SRT stream from the server.
If you notice this you can avoid the issue by setting a port for outgoing SRT connections and another port for incoming SRT connections.
This setup will also win you ~3seconds of latency when used. The only difference is that the port changes depending on whether the stream data comes into the server or leaves the server.
6. Recommendations and best practices
One port for input, one for output
The most flexible method of working with SRT is using SRT over a single port. Truly using a single port brings some downsides in terms of latency and stability however.
Therefore we recommend setting up 2 ports, one for input and one for output and then using these together with the ?streamid parameter.
This has the benefit of making it easier to understand as well, one port handles anything going into the server, the other port handles everything going out of the server.
Getting SRT to work better
There are several parameters (options) you can add to any SRT url to configure the SRT connection.
Anything using the SRT library should be able to handle these parameters. These are often overlooked and forgotten. Now understand that the default settings of any SRT
connection cannot be optimized for your connection from the get go. The defaults will work under good network conditions, but are not meant to be used as is in unreliable connections.
If SRT does not provide good results through the defaults it’s time to make adjustments.
A full list of options you can use can be found in the
SRT documentation.
Using these options is as simple as setting a parameter within the url, making them lowercase and stripping the SRTO_ part. For example SRTO_STREAMID
becomes ?streamid= or &streamid= depending on if it’s the first or following parameter.
We highly recommend starting out with the parameters below as they are th emost likely candidates to provide better results.
Latency
latency=120ms
Default 120ms
This is what we consider the most important parameter to set for unstable connections. Simply put, it is the time SRT will wait for other packets coming in before sending it on. As you might understand if the connection is bad you will want to give the process some time. It’ll be unrealistic to just assume everything got sent over correctly at once as you wouldn’t be using SRT otherwise! Haivision themselves recommend setting this as:
RTT_Multiplier * RTT
RTT = Round Time Trip, basically the time it takes for the servers to reach each other back and forth. If you’re using ping or iperf remember you will need to double the ms you get.
RTT_Multiplier = A multiplier that indicates how often a packet can be sent again before SRT gives up on it. The values are between 3 and 20, where 3 means perfect connection and 20 means 100% packet loss.
Now what Haivision recommends is using their table depending on your network constraints. If you don’t feel like calculating the proper value you can always take a step appraoch and test the latency in 5 steps. Just start fine tuning once you reach a good enough result.
1:  4 x RTT
2:  8 x RTT
3: 12 x RTT
4: 16 x RTT
5: 20 x RTT
Keep in mind that setting the latency higher will always result in a loss of latency. The gain is stream quality however. The best result is always a balancing act of latency and quality.
Packetfilter
?packetfilter=fec-options
This option enables forward error correction, which in turn can help stream stability. A very good explanation on how to tackle this is available here. Important to note here is that it is recommended that one side has no settings and the other sets all of them. In order to do this the best you should have MistServer set no settings and any incoming push towards MistServer set the forward error correction filter.
While we barely have to use it. If we do we usually start out with the following:
?packetfilter=fec,cols:8,rows:4
We start with this and have not had to switch it yet if mixed together with a good latency filter. Now optimizing this is obviously the best choice, but it helps to have a starting point that works.
Passphrase
?passphrase=uniquepassphrase
Needs at least 10 characters as a passphrase
This option sets a passphrase on the end point. When a SRT connection is made it will need to match the passphrase on both sides or else the connection is terminated. While it is a good method to secure a stream, it is only viable for single port connections. If you were to use this option with the single port connection all streams through that port would use the same passphrase, making it quite un-usable. If you’d like to use a passphrase while using a single port we recommend reading the PUSH_REWRITE token support post.
If you want to use passphrase for your output we recommend setting up a listener push using the push panel style as explained in Chapter 3. Setting up SRT as a protocol would set the same passphrase for all connections using that port, which means both input and output.
Combining multiple parameters
To avoid confusion, these parameters work like any other parameters for urls. So the first one always starts with a ? while every other starts with an &.
Example:
srt://mistserveraddress:8890?streamid=streamname&latency=16000&packetfilter=fec,cols:4,rows:4
Conclusion
Hopefully this should’ve given you enough to get started with SRT on your own. Of course if there’s any questions left or you run into any issues feel free to contact us and we’ll happily help you!
WebRTC, RTMP, and WHIP - Choosing the Right Protocol for Your Streaming Needs
WebRTC, WHIP and RTMP are both widely used for streaming media, but they have distinct characteristics and are suited for different use cases. Here’s a detailed comparison,
What is WebRTC?
WebRTC (Web Real-Time Communication) is an open-source project that enables real-time communication directly in web browsers and mobile applications. It allows for peer-to-peer (P2P) communication, enabling features like video calls, voice calls, and data sharing without the need for plugins. WebRTC is designed for low-latency, real-time interactions, making it ideal for applications requiring immediate communication.
What is WHIP
WHIP (WebRTC HTTP Ingestion Protocol) is a protocol that allows media sources to push streams to a WebRTC endpoint. It is particularly useful for scenarios where a media source needs to send a stream to a WebRTC server, such as in live streaming applications. WHIP provides a way to bridge traditional media sources with WebRTC endpoints, enabling more flexible and scalable streaming solutions. BLANKOM Video Encoder with intergrated WHIP, works with Tencent RTC (TRTC), Millicast, Dolby, etc.
What is a WHIP Bearer Token?
A Bearer Token is an OAuth2-style access token used in the Authorization header for WHIP requests.
It is required to authenticate with the WHIP endpoint when publishing a WebRTC stream.
WebRTC Encoder settings,
Obtaining a WHIP (WebRTC HTTP Ingestion Protocol) Bearer Token from a WebRTC Provider,

BLANKOM WHIP Video Encoder works with millicast webrtc

BLANKOM WHIP Video Encoder works with Tencent RTC (TRTC)
What is RTMP?
RTMP (Real-Time Messaging Protocol) is a network protocol used for streaming audio, video, and data over the internet. It was originally developed by Adobe and is widely used for live streaming to platforms like YouTube, Twitch, and Facebook Live. RTMP is designed to provide reliable, ordered delivery of data, making it suitable for high-quality, scalable live streaming.
Key Differences
| Feature | WebRTC | RTMP |
|---|---|---|
| Latency | Ultra-low latency (<500ms, often sub-second) | Moderate latency (2-5 seconds) |
| Browser Support | Native support in modern browsers (Chrome, Firefox, Safari, Edge) | Requires conversion to HLS/DASH for playback in browsers |
| Transport Protocol | UDP (primarily) for speed, with TCP fallback | TCP-based for reliability and ordered delivery |
| Connection Type | Peer-to-peer (direct device communication) | Client-server (stream to a central server) |
| Scalability | Limited for large audiences; requires SFUs/MCUs for scalability | Highly scalable, works well with CDNs |
| Security | End-to-end encryption using DTLS-SRTP | Basic encryption; RTMPS (RTMP over SSL/TLS) for secure ingestion |
| Primary Use Case | Real-time communication (video calls, online gaming, live auctions) | Live streaming to platforms like YouTube, Twitch, Facebook Live |
Technical and Practical Considerations
Latency:
WebRTC: Provides near-instantaneous streaming, making it ideal for applications requiring real-time interaction, such as video conferencing and online gaming .
RTMP: Introduces a few seconds of delay, which is generally acceptable for live streaming events where real-time interaction is less critical .
Browser Support:
WebRTC: Works directly in modern browsers without additional plugins, making it easy to integrate into web applications .
RTMP: Not natively supported in browsers; requires conversion to HLS or DASH for playback .
Transport Protocol:
WebRTC: Uses UDP for faster transmission, which can result in occasional data loss but ensures low latency. It falls back to TCP if UDP is not available .
RTMP: Uses TCP, ensuring all data arrives in the correct order but at the cost of higher latency .
Connection Type:
WebRTC: Peer-to-peer model allows direct communication between devices, reducing the need for intermediary servers .
RTMP: Follows a client-server model, where the stream is sent to a media server before distribution to viewers .
Scalability:
WebRTC: Challenging to scale for large audiences; requires additional infrastructure like SFUs (Selective Forwarding Units) or MCUs (Multipoint Control Units) .
RTMP: Works well with CDNs, making it suitable for large-scale live streaming .
Security:
WebRTC: Offers built-in end-to-end encryption using DTLS-SRTP, ensuring secure data transmission .
RTMP: Basic encryption; RTMPS (RTMP over SSL/TLS) can be used for secure ingestion .
Use Cases
WebRTC:
Video Conferencing: Tools like Google Meet, Slack, and Zoom use WebRTC for real-time video calls .
Online Gaming: Real-time interaction and low latency are crucial for a smooth gaming experience .
Live Auctions and Trading: Requires ultra-low latency to ensure real-time interaction .
RTMP:
Live Streaming to Platforms: Widely used for streaming to YouTube, Twitch, and Facebook Live, where reliability and scalability are more critical than ultra-low latency .
High-Quality Broadcasts: Suitable for events where adaptive bitrate streaming and long-duration stability are important.
Conclusion
For Ultra-Low Latency and Real-Time Interaction: Choose WebRTC.
For Scalable Live Streaming to Large Audiences: Choose RTMP.
Hybrid Approach: Some setups use RTMP for ingestion (sending the stream to a server) and WebRTC for delivery (ultra-low-latency playback to select viewers) . Understanding these differences will help you select the right protocol based on your specific streaming needs.
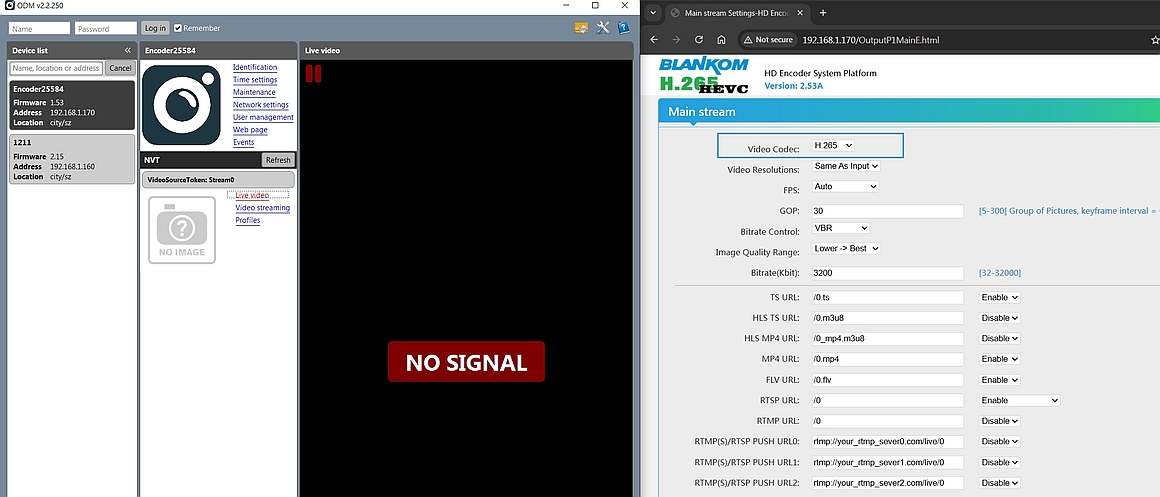
Another hint regarding ONVIF and the Onvif-Device-Manager (ODM=Freeware to Download -> see in our Sektion Download):
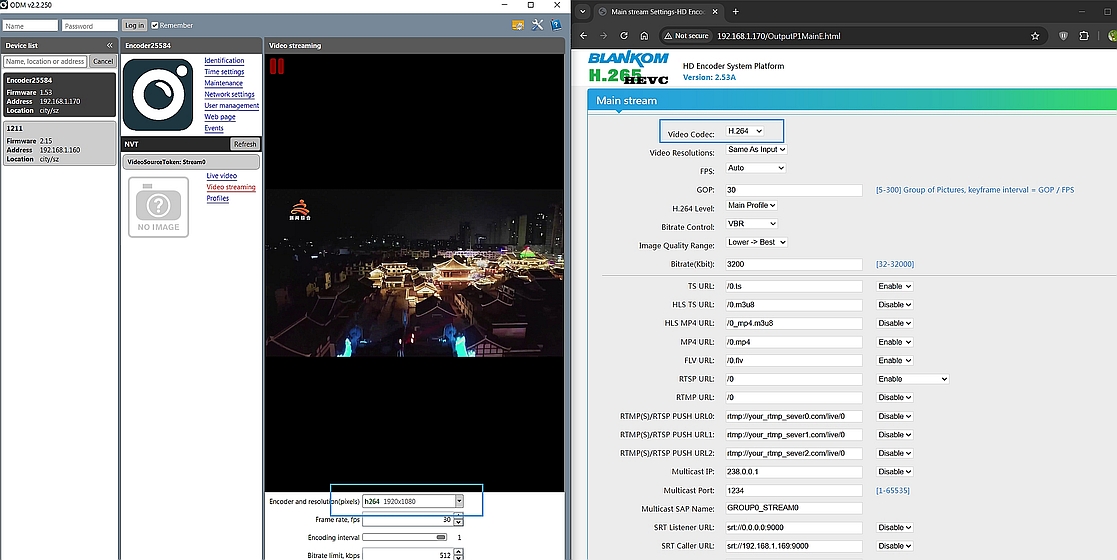
The Live-Video occurs in ODM only, if the Codec of the Encoders is set to h.264. HEVC/h.265 seems to be ignored by the Software:
See: (click the picture to increase)
Here with h.264 Codec:
Posted on: Jan, 2026